Monday, October 19, 2009

flower tutorial

I found this quick little tutorial while blog surfing, and thought I would share. Credit belongs to Elania.

Here is how to:

First cut a fabric scrap about 5×5 inches. Fold it in half to form a triangle and do two more folds like that!!
Photobucket Photobucket Photobucket
Then from the end with the openings cut a petal like shape and when you will open it you will have something like this:
Photobucket Photobucket

Turn it over and place a large brad in the center of it. Wrap the fabric up and secure with a rubber band.
Photobucket Photobucket Photobucket

Cut the center of another paper flower or a paper circle or whatever you can imagine and wrap it around the fabric brad to creat a second layer.
Photobucket Photobucket

And then decorate the top of it by adding smaller flowers, or bling or stickers!!

Photobucket

Here is a layout I have made with a fabric flower in green, decorated with a felt flower, a chipboard button and some bling!!

Photobucket


Mixed Media tutorial

I found this while surfing today. Hope it inspires someone.


Mixed media influenced border tutorial This tutorial is adapted from and influenced by a tutorial I saw by Dina Wakley a while back. She is amazing at inking and using mixed media techniques on her pages. I am very inspired by her lately. Lets get started!

Photobucket

For this step you can use any kind of text paper that you have on hand. Old books work really well. For my page I tore up a page from a vintage math book that I had laying around.

Photobucket

You can use any type of paint that you have on hand. I happened to have Liquitex heavy body acrylics - but any kind of acrylic paint will work just fine.

Photobucket

Keep the paint light or watered down so that you can see the text through the paint. I used a bunch of different colors so that there would be a bunch of layers and provide a sense of depth.

Photobucket

I freehand stitched a vine/leaf pattern onto my page with my sewing machine in a contrasting thread color (black in this case). You can stitch any sort of design you want - I wanted to keep it organic. Also if you don’t have a sewing machine you could try embroidering or hand stitching on your page, or add a layer of rub ons instead of stitching.

Photobucket

My final touches were rings of gesso that I created by dipping an old glass into the gesso and then stamping them on my page. I also added some deep purple paint splatters. An easy way to create splatters is to use two brushes. Dip one of them into your chosen paint color and then hold the other one firmly in your non-dominant hand parallel to your workstation. Then bang your paintbrush with the paint over the other paintbrush the paint will splatter onto your layout keeping your hands fairly clean.

Photobucket

Sunday, October 18, 2009

3 quickies

With all my car drama, I have not been in a very creative mood this week. So after Blake was fast asleep I sit down to create something Saturday night. Before I knew it, these three Layouts were finished. It was relaxing.

I absoutely love this page. I fell together in less than 10 minutes. Everything here was scraps laying on my table. They were already in these sizes. Perfect.


Take care everyone, hugs and kisses. Cathy.

Tuesday, October 13, 2009

fair 2009


Hello everyone!

This weekend, we took Blake to the fair, for the first time. He had a blast! He was fearless, which surprised me to some extend, though I'm not sure why. He's never really shy or stand off-ish to anything. For some reason, I thought he would be. By far his favorite ride was the worm kiddie coaster. He must have rode this thing 4 or 5 times. He keep calling it a choo-choo and yelling choo-choo while they were loading up.


Who knew car shopping was so hard. Its proving to be a difficult search, or maybe I'm being too picky and expecting to much for a used car. The hunt continues....

I'll leave you with some photos from the fair.


Tuesday, October 6, 2009

down to 3 choices?

I'm having a hard time narrowing down the car search. I think we have decided between these three cars? Decisions are so hard to make. White 2007 G6 HTC, Smoke gray 2005 mustang, and the 2004 orange mustang. I like the G6 because its something new and different, the 2005 because of the red leather interior (always loved that) and the 2004 bc its orange (love the color lately). The top 2 will end up costing me about $140- 170 a month and the last would be paid off.

So any opinions are welcome.


I think I'm leaning toward the white G6. I'm not sure bc I've never owned a Pontiac and 2nd Pontiac is stopping production. Therefore Im not sure if its a good choice or not.

Sunday, October 4, 2009

Fabrics flowers

I know these are simple, but I think that makes them so cute. Enjoy!

* Fabric or felt
* Needle
* Matching Thread
* Matching Button

Step 1
Using a circle template, trace out a circle using a marker. The size is completely up to you…the bigger the circle, the bigger the yo-yo etc

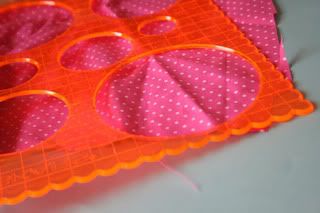
Should look like this

Step 2
Cut the circle out using fabric scissors

Step 3
Thread a needle with co-ordinating thread

Step 4
Using a running stitch, stitch around the whole circle…don’t tie a knot at the start or finish !!!

Step 5
Now pull both ends of the thread until the circle tightens to look like this….now tie both ends in a knot

Step 6
You can now use the left over attached thread to sew on a button to cover the ugly center!